Otherwise known as a moblog, mobile blogging has two meanings –to update your blog on a mobile device and/or to update your blog on the move.
In April 2013 I ran my first trip abroad with 40 students and 4 staff. I was given permission from school to experiment with mobile blogging. We were to take the coach to Picardy in Northern France and spend 3 nights there before returning again. I knew I would have 3G while in the UK and some connection at the activity centre as well as any random coffee shops with free wifi. These things are always a risk especially when you are relying on an internet signal but I thought well worth giving it a go. I practised with the blog before giving the details to parents and was happy I could update it regularly.
Before I explain, I have to say that updating the blog from my phone while I was away was almost as easy as sending a text message. Uploading videos slightly trickier but still in the relatively easy category for most non ICT folk.
Here’s our blog 🙂 BLS in Picardy

How to make your own moblog…
- Ask permission from school and then from parents so you can put students photos on the blog
- Decide your blog name and make an account with wordpress https://signup.wordpress.com/signup/
- Decide a Theme – ie what you want it to look like – there are lots of free ones to choose from
- On your mobile device (I used my iphone) download the app ‘poster for wordpress‘ £1.99 and sync it with your account (ie type in your new account details). The official free WordPress app is poor and unreliable in my experience.
- From your app click the plus sign + and then ‘blank’ option and start writing your post. To give your new post a title click the cog symbol. To add a picture click the photo symbol. Click Publish and hey presto, it’s all done.
How to get videos in your blog. A little trickier but easy once you know how. This option is easier to do on a computer rather than a mobile device.
- Make a Youtube account. Think carefully about your username as it can’t be changed.
- Take a video on your mobile device – preferably 20-30 seconds in landscape mode and see if there is an option to ‘Upload to Youtube’ (you will need to log in) Otherwise upload it manually from your camera to your computer.
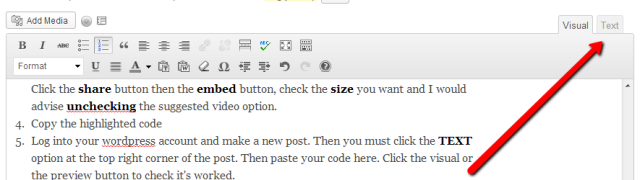
- Once your video has been uploaded, there are 4 things to look for under the video. Click the share button then the embed button, check the size you want and I would advise unchecking the suggested video option.
- Copy the highlighted code
- Log into your wordpress account and make a new post. Then you must click the TEXT option at the top right corner of the post. Then paste your code here. Click the visual or the preview button to check it’s worked.
- And Publish.
Happy Mobloging

The feedback from parents both during the trip was fantastic, they loved being able to follow our journey and see all the activities their children got up to and comment on the blog. The effort to update the blog was more than worth it. Here are some of the comments we received…
“…The blog was fab and it was lovely that both his Grandma and Auntie could also follow his experience.”
“I enjoyed reading the blog very much!”
“Thank you also for the blog it was great to watch their adventures from a distance and I am now the proud owner of a gravatar-never had one of those before!”
“The blog was a great idea and kept us all amused and informed. The students will be talking about this for years to come. A truly memorable experience.”
“Looks like you’ve had fantastic weather too and having been able to follow your adventures on the blog has been brilliant, what a fantastic idea.”
” It’s been great to follow all your fun and games this weekend on the blog. Many thanks to the Blogging Teacher Team for taking the time to do this.”